mywifiext setup-mywifiext net setup
Looking to install or resolve issues with your Netgear WiFi range extender? Use Mywifiext and visit the links below for instant help.
Set Your Netgear WiFi Extender Using Mywifiext.net
A WiFi range extender designed by Netgear is set in areas where there is weak reception or unreachable for the router, thereby giving way to stronger or more amplified coverage of WiFi on your whole office or house, ensuring an interrupted connection everywhere around. This is a step-by-step guide that will help you set up your Netgear WiFi range extender using Mywifiext.net, troubleshoot common issues, and optimize your connection for peak performance.
What is Mywifiext.net?
Mywifiext.net is a local web address that helps you access the configuration page of your Netgear WiFi extender. It is not a typical website but rather a portal where you can configure your extender settings, update the firmware, and manage network connections.
Some of the important features available on the Mywifiext.net portal are as follows:
- Extender’s dashboard where you can monitor its status.
- You can configure and personalize network settings like SSID, security protocols, and more.
- Firmware upgrade option to upgrade performance and get rid of bugs.
- Troubleshooting is available in case you encounter a connection problem.
Since Mywifiext.net is a local address, you should be connected to your Netgear extender’s network to log in to the portal.


Prerequisites for Netgear WiFi Extender Setup
Before you start the setup, you will require the following:
- Netgear WiFi Extender – Ensure that it supports your router model.
- WiFi Router – It should have a stable internet connection and work correctly.
- Power Outlet – A nearby electrical socket to connect the extender.
- Computer, Laptop, or Mobile Device – A device with a web browser to access Mywifiext.net.
- WiFi Network Name (SSID) and Password – You will need the SSID for your home network and the WiFi password to complete the setup process on the extender.
All devices must be within range of the WiFi router and the extender, and you should have all the required login credentials available.
Step 1: Unbox and Prepare the Netgear WiFi Extender
- Unpack the Extender – Open the box and make sure the extender is undamaged. You should find the extender, power adapter, and user manual.
- Choose the Best Location – For the first setup, position the extender near your WiFi router. This way, the extender can easily connect to your home network for proper setup.
- Insert Power Adapter into the Extender – Insert the power adapter of the extender and connect it to an electrical outlet.
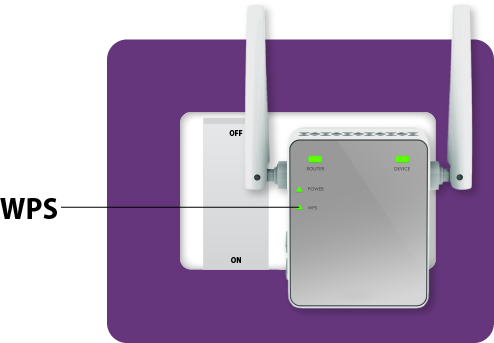
- Verify the Power LED – The power LED on the extender should turn on and stay green. In case it is not, power it on by using the Power button.
Step 2: Connect to the Netgear Extender Network
Connecting through a Web Browser (Laptop/Desktop)
- Open WiFi settings on your computer or laptop.
- Choose “NETGEAR_EXT” from the list of available networks. This is the default network name that the extender creates.
- Open a web browser and enter mywifiext.net in the address bar. Click Enter.
- If the page does not load, try entering in the address bar instead of Mywifiext.net.
Connecting using the Netgear Nighthawk App (Mobile Users)
- Get the Netgear Nighthawk App from the Apple App Store or Google Play Store.
- Open the app and follow the step-by-step instructions to set up your extender. The app makes the process faster, especially for beginners.
Note: You must be connected to the NETGEAR_EXT network before proceeding with the setup.
Step 3: Set Up the Netgear WiFi Extender
- Login or Create a Netgear Account
- If it is your first time setting up a Netgear device, you will have to either log in using your Netgear credentials or create a new account. This account is useful for managing multiple devices and settings.
- Choose a WiFi Network to Extend
- Once you log in, the setup wizard will display a list of available WiFi networks.
- Choose your home WiFi network (SSID) from the list. Ensure that the network is the one you want to extend.
- Enter Your WiFi Password
- The extender will ask you to enter the WiFi password of the network you chose in the previous step. This enables the extender to connect to your main router.
- Setup the Extended Network
- Once connected to your router, the extender will automatically create a new WiFi network, for example, “HomeWiFi_EXT”.
- You can also rename the extended network with a new name (SSID) and change the password if you like. This is not mandatory, but changing the network name makes it easier to distinguish between the main and extended networks.
- Save and Apply Settings
- Click the Finish button to save all settings.
- The extender will restart, apply the configuration, and connect to your main router.
Step 4: Connect Your Devices to the Extended Network
Once configured, you can start using the extended network by following these steps:
- Open WiFi settings on your phone, tablet, or laptop.
- Search for the new name of the extended network within the list of available networks (such as “HomeWiFi_EXT”).
- Type in the WiFi password that you created when setting up.
- Join the extended network and enjoy WiFi strength in every part of your space.

How to log to Mywifiext.net after the setup
After the installation process, you may want to log into Mywifiext.net to change the extender settings. Here’s how to do it:
- Connect your phone, laptop, or computer to the extended WiFi network, such as “HomeWiFi_EXT.”
- Open a web browser and type mywifiext.net in the browser’s address bar.
- Enter your Netgear login credentials to access the extender dashboard.
- After logging in, you can manage your extender’s settings, see its status, and update its firmware when necessary.
How to Update Netgear Extender Firmware?
Firmware update is essential as it can increase performance, debug bugs, and add new features to your extender. You can update your extender’s firmware by:
Log in to Mywifiext.net using your credentials.
Move to Settings > Firmware Update.
Click Check for Updates. In case an update is available, it will pop up asking to install it.
Follow the on-screen instructions to update the firmware. Once completed, the extender will automatically restart with the latest firmware version.


Optimizing Your Netgear WiFi Extender Performance
To ensure your Netgear WiFi extender is working optimally:
- Place the extender strategically – It should be positioned midway between the router and the dead zone to provide maximum coverage.
- Use an Ethernet cable – If your extender supports wired connections, connect it to your router via an Ethernet cable for a more stable connection.
- Avoid interference – Keep the extender away from electronics like microwaves, Bluetooth devices, and cordless phones, which can interfere with the signal.
- Update firmware regularly to ensure the latest performance improvements and security fixes.


Troubleshooting Common Problems
Though the MyWiFi EXT Extender is designed for simplicity, you may encounter occasional issues. Here are some common problems and their solutions:
Mywifiext.net won’t Work
Can’t Connect to the Extended Network
Slow Internet Speed on the Extender
FAQs About Netgear WiFi Extender Setup
Ideally, place your extender halfway between your router and the area with poor WiFi. Avoid corners, walls, or any spots with heavy electronic interference.
This could be due to interference or a weak connection to the router. Try relocating the extender and ensure it’s well within range of the router.
Yes but be mindful of overlapping coverage areas to prevent interference. Each extender should connect directly to the router, not to another extender.
Most Netgear extenders are compatible with any standard WiFi router. Always check the product specifications to confirm compatibility.


mywifiext net login
Setting up your Netgear WiFi Extender using the Mywifiext.net interface is a simple, quick procedure that can help upgrade your home or office’s WiFi network significantly. With greater coverage and reliability, you will now be able to enjoy smooth internet connectivity across the entire space.
If you face some problems, try the troubleshooting process in this document or contact Netgear Support for further assistance. Update your firmware and place your extender for optimal performance.
Enjoy uninterrupted WiFi coverage throughout.